Why & How to change DNS Windows 10?
DNS server is mainly used to make your connection stable. Domain Name Service is the one that translates the IP address of a web server into a URL when you type something into your web browser. For instance, if you type something, the DNS will first find out the IP address, and then the browser will be sent to that IP address.
Do you want to reach the correct website? Then give attention to change DNS Windows 10 to reach the website. Changing the DNS will help you with the browsing speed and will also improve security. To your knowledge, any website that you are visiting using the DNS server can be tracked.
Methods you can use to change DNS Windows 10
There are some ways that will help you to change the DNS server. The ways are listed below, so follow the steps accordingly.
By using the Control Panel
First, you have to open the Control Panel to initiate the process. Then, the Network and Internet option will appear on your screen. You need to click on it to go further. Now, you have to click on the Network and Sharing Centre option, you will see a dialog box appear.
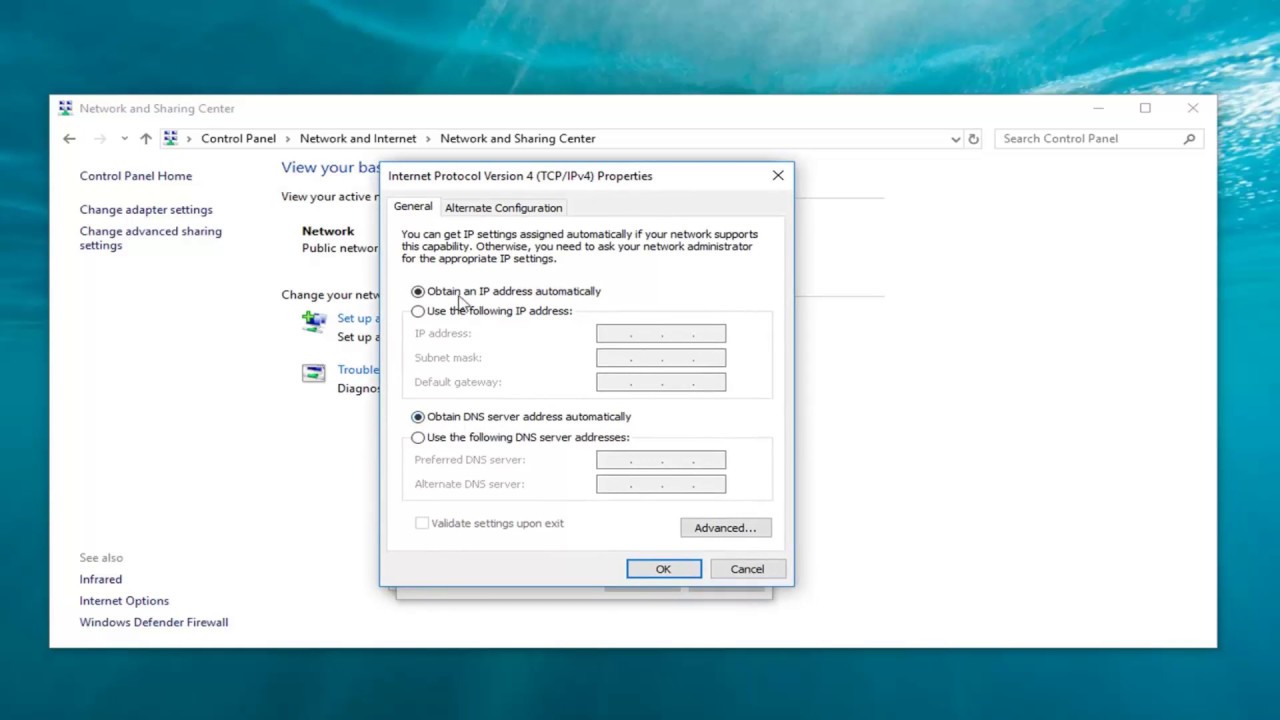
Now in the dialog box, on the top left pane, you will see the Change Adapter Settings option, click the option. Then, you will see the Network Interface that connects Windows 10, you have to right-click on it. An Options box will appear and you have to select the Properties option. The Ethernet1 Properties dialog box will appear.
You have to select and check the Internet Protocol Version 4 (TCP/IPv4). Then, you will see the Properties option, click it. You have to select the ‘Use the following DNS Server Addresses’ option to initiate the process. Now you have to type the Preferred and Alternate DNS addresses, on the box that is given.
Finally, select the Advance button below, and after completing all the steps click on the DNS tab and click on the Add button. You also have to specify the Alternate DNS Server Address and then click on the Add button. To end the process, you have to click on the Ok button and then select the Close button. After you have completed all the steps you will see that the device will start using the DNS settings that have been specified.
Change DNS Windows 10 is by using settings
You can also change DNS Windows 10 by using the Settings app. You just have to follow the steps that are given in the next sentence. First, you need to open the Settings app. Then, you have to look for the option Network and Internet and click on it to go further. Now, click on the Ethernet.
You can also go for Wi-Fi, it completely depends on your connection. You just need to select the connection to connect the network with Windows 10. Now, if you scroll down you will see the IP Settings section and below that the Edit option. Here click on the Edit button, a dialog box will appear.
You will see the Edit IP Settings drop-down menu. Click the drop-down menu and select the Manual option. Also, you need to turn on the IPv4 switch. Scroll down and confirm the Preferred DNS and also Alternate DNS Addresses. After completing all the steps you have to click on the Save button. Now, you can now connect to the internet. Another way is also listed below that you can use to change the DNS Windows 10.
Using the Command Prompt
This is another alternate way to change DNS Windows 10. All the steps that will help you on how to use the Command Prompt are given. First, you have to go to the Start option and open it. Now, look for the Command Prompt and right-click the top result.
A Run As Administrator option will appear on your screen. You need to select the option to go further. Then, type the command ‘netsh’ and press Enter, so that it can launch the tool and change the Networking settings. Then, type ‘interface show interface’ and press Enter. Thus, you can identify the names of the network adapters.
Again type ‘interface IP set DNS name=”adapter-name source=”static” address=”X.X.X.X”. This is used to set the primary DNS IP address. In the place of the adapter name you have to type the name of the Network Adapter that you have identified. Also in place of X.X.X.X, type the IP address of the DNS server that you want to use.
In case of alternate DNS IP address, type ‘interface IP add DNS name=”adapter- name” addr=” X.X.X.X” index=2’. Again in place of adapter-name, you have to type the network adapter and also in place of X.X.X.X you have to type the secondary address you want to use.
Conclusion…..
This is all about how you can change DNS Windows 10. All the tried and tested methods are given. It will definitely help you out, you just have to follow the points as it is given. The steps are very easy to understand, but if you fail to change DNS Windows 10, then seek assistance from professionals.
Related Articles