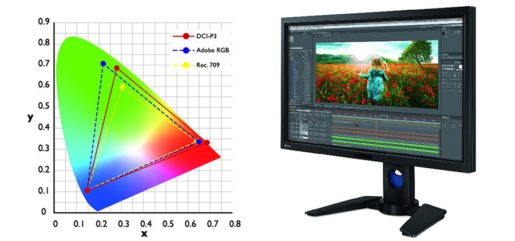
How to Adjust the Monitor for Correct Color Rendering

In order to evaluate modern monitors, it’s enough to find the relic device of the nineties and see the picture on their bulging eye-catcher. What will you see? Monstrous pixilization (we argue, for your aunt’s smartphone, which only and what you need to call and see the weather, a screen with better resolution), strange colors, distortions at an angle … And these are CRT monitors that were once considered the best! No, I’m not going to work for this cat’s stand!
You can say the same about 10-15 years later about today’s monitors. The problem is that today we do not have monitors from 2032 at hand, so we’ll have to bring to the mind those monitors that are. And since it is often more important for manufacturers to make the monitor look good on the shelf of the store, for home use it is necessary to screw it yourself. Consider how to adjust the monitor so that your eyes are not tired, and the colors on the screen correspond to the colors when printing or on a movie screen.
Calibrating the monitor
The procedure of adjusting the image parameters so that it corresponds most to the real colors, and the location of the picture on the screen was correct, is called calibration. It is not necessary to do this if you are working on a computer with documents, sound, code or refresh various other devices. But for the design or processing of video, exact colors are needed.
Of course, for the calibration of the monitor, there are special tools. However, we will use the built-in Windows utility, which should be enough for us. Her developers took into account both the features of the image on the computer and the properties of the human vision.
Pictures-standards are already built into the application. You can find it through the Control Panel by entering “Calibrate Screen Colors” in the search, or by going to Start / Hardware and Sound / Screen / Color Calibration.
If you are using a desktop computer, then you have to simultaneously use the PC controls (keyboard and mouse) and monitor. As a rule, on the board or behind the side of the monitor there is a row of buttons through which you can call its menu. If you do not find them immediately, then before you set up the monitor for the correct color rendition, read the instruction manual for your monitor model. By the way, they usually tell how to adjust the monitor to the screen size: the same buttons will help to stretch or compress the picture vertically and horizontally or to move it in the right direction.
On laptops, for obvious reasons, there is no autonomous control of the screen. Therefore, you need to adjust the image through the running application. However, all the necessary functions for this are there.
Ideal colors, brightness, and contrast are needed for you not for a tick and not for a report, but for your own eyes to see on the monitor the maximum of what it is capable of. Therefore, the calibration should be done taking into account the ability of your eyes. There are especially drawn picture tests, which allow you to estimate the defects of the image on the monitor:
This picture shows figures on a light background, gradually brightening, and on black, gradually darkening. You need to be honest (honestly, I repeat, it’s not an oculist in the military enlistment office!) To note for yourself how many figures you see on each of the backgrounds and adjust the brightness until you cannot distinguish them all in both rows.
Gamma – a parameter that provides the good perception of details in well-lit and dark areas of the picture. With a properly tuned gamma, this picture should not have either light or dark dots in the center of gray spots, their color should be uniform.
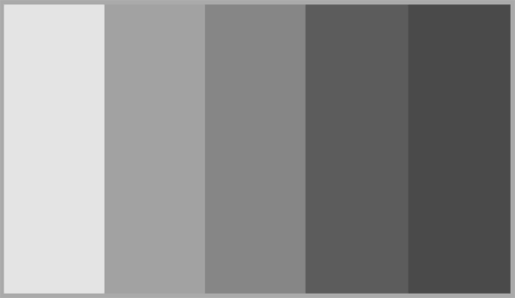
The last stage is devoted to how to adjust the colors on the computer monitor. It’s strange to see a gray image, but that’s exactly what we need. If properly configured, you will not see here red, green, or blue – only shades of gray (they are here, fortunately, ten times smaller than you thought).
At the last stage you can compare “how it was” and “how it became” with one click of a button. If you like the result more – we congratulate: you, and we worked for good reason.
Useful tips for calibration
There are several rules that should be observed when calibrating the monitor:
- Warm up the monitor for 15-20 minutes, so that it will work in normal mode, and only then proceed with calibration.
- Before calibrating the monitor, wipe it well.
- Calibrate with the light that normally works. And it is better (if possible) to repeat the procedure in daylight and electric. Ideally, the results should coincide.
- Do not rush to use professional equipment. Most likely, next time you will have to do calibration when you buy a new monitor.
- But if you for some reason reset the display parameters, it is better to calibrate it again and turn off all automatic values (auto brightness, auto contrast, etc.)
- If the images you are working with on another screen look different, do not rush to remake everything in yourself. Print a test image on a good color printer and check which monitor it best fits.
That’s all. Bright and succulent colors to you!