How to Open Advanced Bios or Advanced Mode
Usually the question “how to open advanced bios or advanced mode?” Is set in order to make more detailed settings in basic input / output systems or simply BIOS .
The first thing you need to know, before you change anything in BIOS, you need to understand what you are doing, and even more so in the mode of BIOS usage that is often hidden from beginners. Since changing some settings can make it difficult to turn on the computer and boot the operating system.
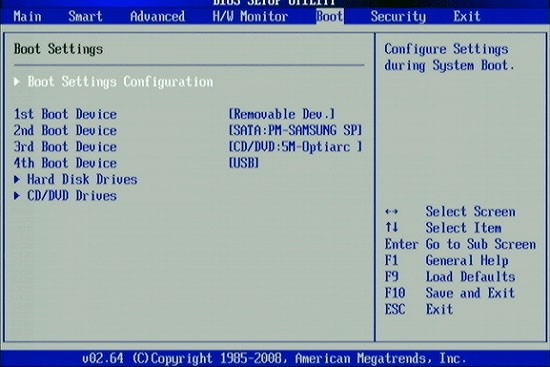
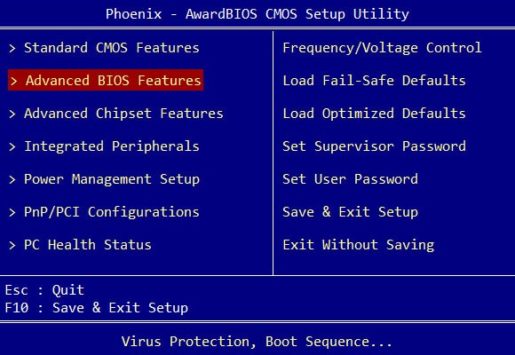
Approximate view of the Advanced bios Features window
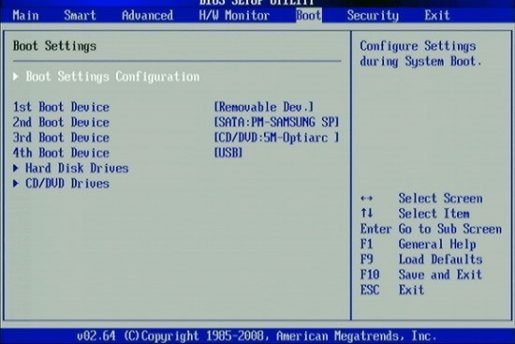
As you can see from the screenshots given in different versions and developers of the BIOS, the “Advanced …” tab differs. Some of them in this tab contain the priority settings for loading devices. Yes, it is those settings necessary for installing or reinstalling Windows, in other words, it is the boot settings from the device on which there is a program for installing, recovering, booting the operating system from the disk (Live CD, Live USB, etc.). Some manufacturers take the priority settings for loading devices into one tab named “Boot”. That most likely is the right decision and a logical selection of these settings.
Basic settings of the extended menu
Let’s look at the basic settings that the spouse can do on the advanced tab.
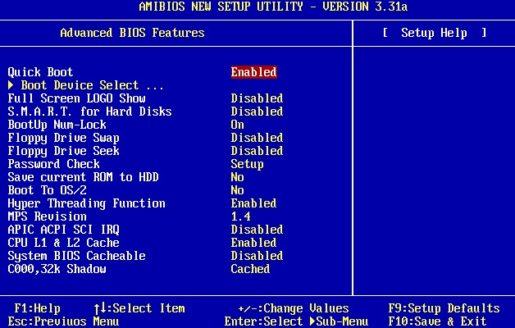
Take for example old AMI BIOS – 3 versions. In others, the BIOS version should have similar functions, possibly other names.
Quick Boot – Quick boot, which means to enable or disable the fast boot of the operating system, without the time spent checking devices and testing the memory of the basic I / O system.
Boot Device Select – The favorite menu and familiar menu for those who have ever encountered reinstalling Windows, in this menu you need to change, if not the default, the priority of loading devices. In other words, here you should select the first device that will be scanned for the presence of boot information (Windows loader or Live Cd), usually a hard disk (HDD) is by default installed, can be changed, for example, to CD \ DVD USB and other devices from the list.
In general, you need to put First Boot Device – CD \ DVD, if the installation program is on the disk, then you can put the hard disk, and leave the third device by priority empty. (two in full is enough for convenience). By analogy, you can put Fist Boot Device – Flash \ USB … if the boot file is on USB-flash.
Full Screen Logo Show is a rare menu, not found on all motherboards and is also rarely used.
SMART for Hard Dist is a function of the BIOS that checks the hard drive for operability, otherwise speaking, this function will tell in advance when your hard disk is recommended to be replaced. The information will be checked every time you turn on the computer. And when the life of the hard drive comes to an end, you will be advised right in the startup screen to copy the data to a new hard disk.
BootUp Numlock is a BIOS function that automatically turns on the right numeric keypad while the computer is turned on.
Floppy … are functions associated with legacy diskettes and devices for reading them.
Password Check – here you can set a password for entering the BIOS. If you forget you will have to remove the battery and reset the settings to the factory settings. It is necessary to protect against “curious eyes”.
Hyper Threading is a complex technology, the essence of which is that the operating system will consider one core of the computer as two and because of this technology the processor is used more rationally. This setting affects performance.
MPS – this option is needed if you have a multiprocessor motherboard.
APIC ACPI SCI IRQ – use the advanced mode if you have a multi-core processor, if the extended mode is disabled, the computer will only see one kernel.
CPU L1 & L2 Cache – enable and disable fast processor memory. It is better not to touch these settings, especially if you do not know what for.
System BIOS Cacheable – old operating systems used part of the finished BIOS functionality, so this option could speed up the work, but now the developers of operating systems do not use it, and therefore it is better to keep it in the off state.
ATTENTION: If updating the BIOS, this option should be disabled (DISABLED). Otherwise, the BIOS may not be flashed, which will result in the BIOS being inoperative.
C00 32k Shadow – this option could speed up the work of the video card by copying the BIOS of the video card into RAM, on modern platforms is not used.
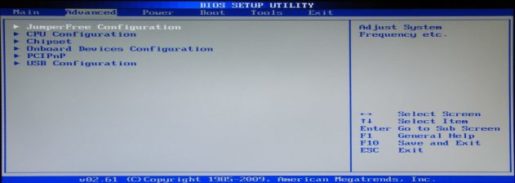
Let’s briefly look at another type of advanced BIOS menu
JumperFree Configuration is the set of settings needed to overclock the computer.
Attention: these settings should be very careful and know what why changes. So the running is connected with the increase of electricity and thermal deposition. A non-adjustable change of these parameters may not affect the correspondent equipment of the computer equipment.
CPU Configuration is information about the processor and its configuration at the moment.
CHIPSET is usually a set of settings for overclocking RAM. The recommendations are the same as in all overclocking parameters.
Onboard Device Configuration is a set of settings for enabling and disabling ports and a network card.
PCIPNP is a set of settings related to the maintenance and processing of interrupt components on the PCI.
USB Configuration is a set of settings related to USB.
Conclusion
In cases where you do not have the “Advanced” tab or it is hidden, you need to find in the prompts, either on the left side, or below which key is pressed to go to the Advanced mode. In practice, the BIOS has a similar structure, just some functions can be rendered in other tabs. The information obtained here can be used for most motherboards.
Related Articles