‘System Thread Exception Not Handled’ Error Resolve with 6 Quick Methods
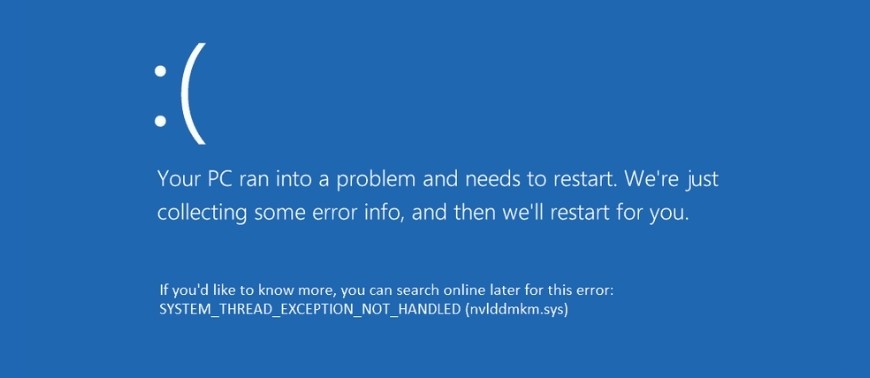
In most of the cases, the user has reported that after pressing the power button or even while restarting the computer they have witnessed a blue screen, along with the error code ‘system thread exception not handled’.
It is a very common error, and it is mainly caused due to the malfunctioning of the device driver. If you are running any program that needs a specific graphic driver, then you might see some errors. No need to worry about this error, it can be fixed. But before going to the main topic you need to have some idea about what this error indicates or when or why this occurs.
This error shows that a system thread in your computer has appeared that the user cannot get. Often the error is addressed by numbers or even by a file name. And, due to this error, your computer can get stuck in a reboot loop.
You can only break this loop if you turn your computer in Safe mode. As already mentioned if you are using a driver that is outdated, corrupted or incompatible then you will witness this error. Few methods are mentioned below that might help you to fix the problem.
Solutions to Fix ‘System Thread Exception Not Handled’
There are some methods that will help you out to fix the error. You just need to follow the instructions as they are given.
1. You need to Uninstall the Faulty Sound Card Driver
Often the users have seen that the error code is caused due to faulty C media driver and is accompanied by unusual sounds. You can go for updating the driver, but it will be more effective if you opt for uninstalling the driver.
Further, you can also let the Device Manager replace the default sound card. The steps will help you to sort the issue.
- First, you need to open the Run dialog box. Either you can go to the Start menu and select the Run option or you can also press the Window and R key together to bring up the Run dialog box.
- In the blank space of the Run box type ‘devmgmt.msc’ and press the OK button. This will help you to open the Device Manager window.
- Now, the Device Manager window will open in front of you. You need to scroll down and expand the Sound, Video And Game Controller option.
- Right-click on any driver related to the C media device. And, you will see a Context menu on your screen, and click on the Uninstall Device option.
- A confirmation will also appear on the screen. You have to click on the box beside ‘Delete The Driver Software’ and at last click on the OK button.
After completing it you have to restart the computer to make the changes effective. Now Windows will reinstall the driver, and if it does not, then go to the Device Manager again. There select the Action option, and click on the ‘Scan For Hardware Changes’ option. Now, see if the ‘system thread exception not handled’ problem is solved or not.
2. Locate the Faulty Driver
You need to locate which driver is causing the error. For that, some simple steps are given below:
- First, you need to hold the Windows and R key together to bring up the Run dialog box. In the blank space of the Run box type ‘eventvwr’ and click on the OK option, this will bring the Event Viewer.
- Then, you need to click on the Windows Logs. From the drop-down, you need to click on the System option so that you can view the recent events.
- Now, you have to search for the ‘search thread exception not handled’ error and locate which driver is faulty.
3. You can Repair Corrupted System Files
You can go to the Repair option for the corrupted files that are affecting the driver. By running the Windows repair program, SFC and DISM. The steps are given below.
For SFC:
- First, you have to open the Command Prompt as an Administrator.
- If you have put your computer in Safe mode you will be able to find the option under advanced options.
- Then, you can type ‘sfc/scannow’ and press the Enter button. This will help you to solve the ‘system thread exception not handled’ problem.
For DISM:
- You have to open the Command Prompt as Administration and then type ‘exe/online/cleanup-image/scanhealth’.
- Then, you have to run any one of the following, either SFC or DISM.
4. You can also try Rebooting your computer
Rebooting can be one of the ways to solve the problem. It is quite effective and in a majority of the cases, the problems have been solved just by rebooting the computer. The steps to reboot the computer are given below.
- First, you need to go to the Settings option preceded by clicking on the Start menu. Then, you need to select the Update And Security option. Also, on the left, you will see the Recovery option, click on it.
- Then, you will see three options on the computer screen: Reset The PC, Go Back To An Earlier Build and Advanced Startup. Out of these three, you have to select Reset The PC, under this option click on the Get Started button.
- You need to choose either Keep My Files or Remove Everything depending on your choice if you want to keep them or shift them somewhere else. These settings will return their defaults and the apps will be uninstalled.
- Click Next to proceed, it might take some time to reset your computer. So, you need to keep on clicking Continue when the option pops.
5. Look over the Display Drivers
As already discussed, a faulty Display Driver can be the reason behind the error. Thus, you just need to uninstall it and then again install the latest version. The steps are given below that will solve the problem.
- First, you need to see whether you can log in to Windows or not. If not, then you need to boot your computer into Safe mode. Turn on the system and shut it down pressing the Power button. You need to repeat this until the system starts in Repair mode.
- Click on the Troubleshoot option, followed by the Advanced option and Command Prompt option. Now on your screen, a black Command Prompt will appear. Type BCDEDIT / SET {DEFAULT} BOOTMENUPOLICY LEGACY. Type exit followed by entering option. Now, click Continue to proceed with the process.
- You can restart your system and keep on holding shift and F8. You will see the Advanced Boot option on the screen. Click the Safe Mode followed by Networking, and then press Enter. You will see your system is running in Safe mode.
- Now, press the Windows and R key. The Run dialog will appear on the screen and in the blank space, you have to type ‘devmgmst.msc’ followed by the Enter option.
- After the Device Manager appears scroll down and double-click on the Display Adapters. Then go for the Uninstall option and restart your system so that the video driver can download automatically.
You can either go for installing the driver or updating it. But first, you need to know which driver is compatible with the system. So, press the Window and R key and in the Run dialog box, you have to type ‘msinfo32’ and press Enter. The System Information will appear on your screen, see the OS type and System type. Thus, you can easily visit the Graphic Card Manufacturer and download a suitable driver.
6. Rename the Faulty Driver to get rid of the error
Renaming the driver will solve your problem by fetching a new copy and reinstalling it. You just need to know where the driver is installed on the hard drive. First, go to the Command Prompt app and search for the Command Prompt. Otherwise, you can even go to the Search option and type ‘cmd’.
Now, you can replace the filename into the Command Prompt and then press Exit. After completing the process, restart your computer and see if the ‘ system thread exception not handled’ error is solved or not.
Conclusion….
There are six methods to get rid of the error. You don’t need to panic seeing the error, it is very common. The methods will help you out to solve the issue. However, if the error persists, then it must a critical issue, don’t forget to hire a professional technician.
Related Articles